Overview
When setting up the plant, only a few essential fields require completion. This allows for flexibility in accommodating missing data that the installer or customer may need to input. Should you decide to switch energy providers or alter your tariff preferences, you may find it necessary to adjust these settings. Similarly, if you’ve added an extra battery, resulting in an increased Total Investment, you may want to update this information. The following guide will provide instructions on how to access and modify these specific details.
How to Access These Details:
To access the plant details, start by navigating to the plant overview screen. Then, click on the yellow box located within the Plant Info section on the right-hand side of the screen.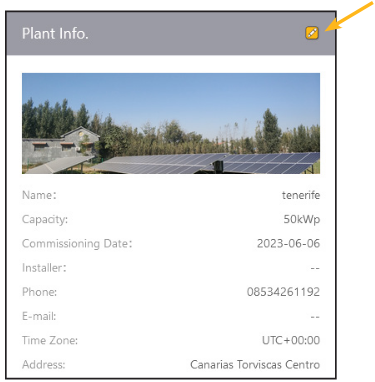
After clicking on the yellow box, a pop-up window will appear. This is where you can edit the details of your plants.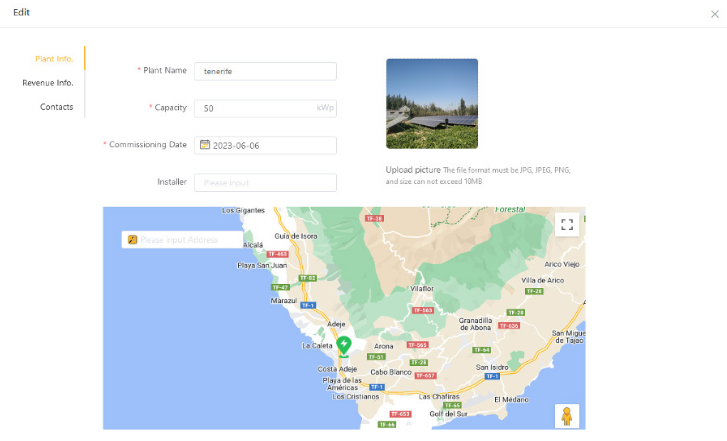
Plant Information:
Through the plant information page you will be able to edit information about the plant.
Plant name. This is the name that will show in the plant list, if you wish to change this, you can do so here.
Capacity. The capacity refers to how much solar has been installed on your system (measured in kWp). For example, if you have 12x 405W panels, you will input 4.86kWp. This setting also sets the cap for your efficiency as the app will see this as your Max. Solar Power. It will then detect how much power you are generating at the time. This depends on how much of the Max. Solar Power is being generated, which will show the efficiency at that current time.
Commissioning Date. This is the date that the inverter was commissioned.
Installer. Here you can input the name of the company that installed the system.
Upload Picture. In this field you are able to upload a photo of the installation.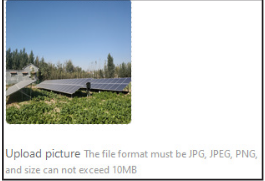
Address. If there is a change of address, or the wrong address is originally inputted, you are able to edit this here. You can use the search bar on the map to locate the property address.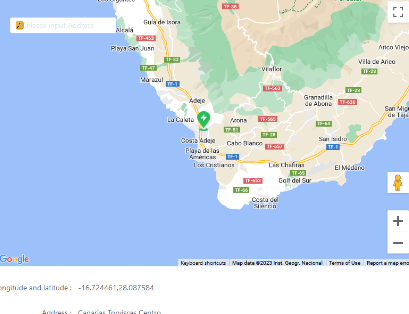
Time Zone.
This is where you can select the time zone you are in by clicking on the drop down and selecting from the available time zones. Please note, you must tick the selected time zone, otherwise this will not save. Remember to Press save at the bottom to keep all the amended details.
Revenue Information:
The revenue information section is all for the currency side of things.
Currency: Here you can select what currency you are using in your country of residence. The app will show any details in that currency.
The revenue info section is all for the currency side of things.
Currency: Here you can select what currency you are using in your country of residence. The app will show any details in that currency.
Total Investment: Here you can input the total amount the customer has paid for the whole install. The app will store this data and then depending on how many kWh of Solar you have produced; the app will calculate how much you have saved and add it to a total comparison to your Total Investment (Total Investment - kWh produced x price per kWh).
Valuation Method: There are 3 main subcategories to this. The live pricing has its own separate manual for the Octopus Tariff:
Constant price refers to a never changing tariff, just put in the box below the price you pay per kWh and press save.
Time of use price refers to a tariff that changes depending on the time of day. You can use the + button on the right to add more times where your tariff might change. In the example shown below, you can see that between 01:00 – 04:30 the price is 12p per kWh, while the rest of the day its 30p per kWh.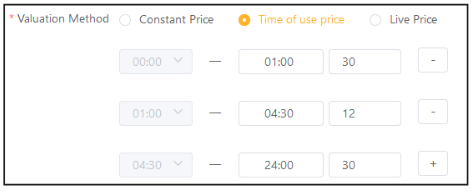
Remember to Press save at the bottom to keep all the amended details.
Contacts
The contact section is designed for essential contact information we may require for your installer in case of any issues. Alternatively, you can input the customer’s information here if they request it. It’s worth noting that entering an email address is the only non-mandatory requirement during the installation process.
Manager: Name of the owner of the plant or the person who installed it.
Phone: Either the Mobile or landline number we can use to contact someone.
E-mail: In cases where a call is not necessary, we can email for any correspondence.
Remember to Press save at the bottom to keep all the amended details.
Was this article helpful?
That’s Great!
Thank you for your feedback
Sorry! We couldn't be helpful
Thank you for your feedback
Feedback sent
We appreciate your effort and will try to fix the article